
Pivoting via Meterpreter [metasploit v6.x]

Pivoting is a technique used during Pentesting. The attacker gain access on one of the remote machine in the target network segment and use that machine to move around another network.

Pivoting is useful in a scenario where you don't have direct access to a remote network. For example, the attacker can access the DMZ server but not the Internal Server segment. But DMZ server can communicate with Internal Server Segment. In such scenario, firstly the attacker gain access to the DMZ server and then use the DMZ server as a foothold to gain access to the Internal Server Segment.

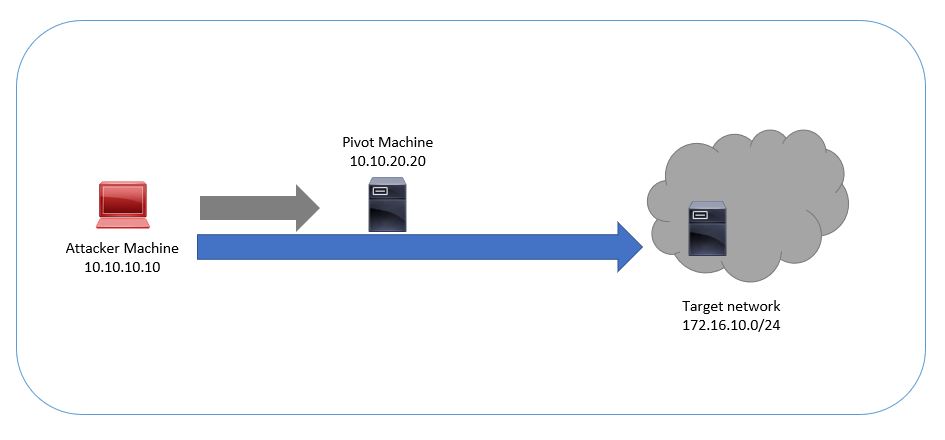
Note that the older versions of metasploit supports MSF scripts but the latest version (metasploit 6.x) doesn't support it. So lets see how to perform pivoting using the newer versions of Metasploit. For the illustration, i assume that the attacker has been gained the access to one of the remote machine and now he needs to move around.

After establishing a meterpreter shell, background it. Since msfscripts are deprecated, we should use the post/multi/manage/autoroute module.

msf> use post/multi/manage/autoroute
    -set the SUBNET (new network range)
    -set the SESSION (meterpreter session)
    -run
You may see the following message after executing the module.   
    [!] SESSION may not be compatible with this module (incompatible session platform: windows)
    [*] Running module against PC-1
    [*] Adding a route to 172.16.10.0/255.255.255.0...
    [+] Route added to subnet 172.16.10.0/255.255.255.0.
    [*] Post module execution completed 

Alternatively, you can add the route manually, using the following command from msfconsole.
route add 172.16.10.0/24 1
    -where 1 is the meterpreter session.

Now the route has been added successfully. Lets do a port-scan of the remote network (172.16.10.0/24)
To run a port scan of the target network using metasploit,
use auxiliary/scanner/portscan/tcp
set RHOSTS //
Specify the network
set THREADS //
Specify the threads
set PORTS //
Specify the ports to scan
run

 If you would like to know how to pivot through different network, read this post.


Popular Posts

RUST error: linker `link.exe` not found

While compiling Rust program in a windows environment, you may encounter the error : linker `link.exe` not found. This is because of the absence of the C++ build tools in your machine. For compiling Rust programs successfully, one of the prerequisites is the installation of the Build Tools for Visual Studio 2019.   Download the Visual Studio 2019 Build tools from the Microsoft website. After the download, while installing the Build tools, make sure that you install the required components (highlighted in Yellow) This will download around 1.2GB of required files. Once everything is successfully installed, reboot and re-run your rust program and it will compile successfully.   Read More on RUST Hello World Rust Program : Code explained RUST Cargo Package Manager Explained Data Representation in Rust.

Download Microsoft Office 2019 offline installer.

When you do malware analysis of documents or office files, it is important to have Microsoft Office installed in your Lab machine. I am using flare VM and it doesn't comes with MS Office. Since Microsoft is promoting Microsoft 365 over the offline version, finding the offline installer is not that easy. Here is the list of genuine Microsoft links to download the office .img files.  Download Microsoft Office 2019 Professional Plus : https://officecdn.microsoft.com/db/492350F6-3A01-4F97-B9C0-C7C6DDF67D60/media/en-US/ProPlus2019Retail.img Download Microsoft Office 2019 Professional : https://officecdn.microsoft.com/db/492350F6-3A01-4F97-B9C0-C7C6DDF67D60/media/en-US/Professional2019Retail.img Download Microsoft Office 2019 Home and Business : https://officecdn.microsoft.com/db/492350F6-3A01-4F97-B9C0-C7C6DDF67D60/media/en-US/HomeBusiness2019Retail.img Download Microsoft Office 2019 Home and Student : https://officecdn.microsoft.com/db/492350F6-3A01-4F97-B9C0-C7C6DDF67D60/media/en-U...

Cisco ASA: Disable SSLv3 and configure TLSv1.2.

For configuring TLS v1.2, the ASA should run software version 9.3(2) or later. In earlier versions of ASA, TLS 1.2 is not supported.If you are running the old version, it's time to upgrade. But before that i will show you the config prior to the change. I am running ASA version 9.6.1 Now ,set the server-version to tlsv1.2, though ASA supports version tlsv1.1, its always better to configure the connection to more secure. Server here in the sense, the ASA will be act as the server and the client will connect to the ASA.     #ssl server-version tlsv1.2 set the client-version to tlsv1.2, if required.     #ssl client-version tlsv1.2 ssl cipher command in ASA offers 5 predefined security levels and an additional custom level.     #ssl cipher tlsv1.2 high we can see the setting of each cipher levels using #show ssl cipher command. Now set the DH group to 24, which is the strongest offered as of now in the AS...

How to Install Netmiko on Windows?

Netmiko, developed by kirk Byers is an open source python library  based on Paramiko which simplifies SSH management to network devices and is primarily used for network automation tasks. Installing Netmiko in linux is a matter o f one single command but if you need to use Netmiko in your Windows PC, follow this process. 1) Install the latest version of Python. 2) Install Anaconda, which is an opensource distribution platform that you can install in Windows and other OS's (https://www.anaconda.com/download/) 3) From the Anaconda Shell, run “ conda install paramiko ”. 4) From the Anaconda Shell, run “ pip install scp ”. 5) Now Install the Git for Windows. (https://www.git-scm.com/downloads) . Git is required for downloading and cloning all the Netmiko library files from Github. 6) From Git Bash window, Clone Netmiko using the following command git clone https://github.com/ktbyers/netmiko&#8221         7) Onc...

PrintNightmare (CVE-2021-1675) PoC exploit Walkthrough

I am not an exploit developer but was interested to see how this vulnerability can be exploited. So i tried to replicate the infamous PrintNightmare vulnerability using the following PoCs ( https://github.com/cube0x0/CVE-2021-1675 ) and ( https://github.com/rapid7/metasploit-framework/pull/15385 ) However i had trouble with the new metasploit module (auxiliary/admin/dcerpc/cve_2021_1675_printnightmare) and i couldn't able to exploit the machine successfully. So i tried the second PoC from cube0x0. This one has done the magic. I just followed the guidelines with couple of tweaks. First of all, i installed the impacket (cube0x0 version) which will install the required modules and files. After that i set up a samba share with an anonymous login. This is required for hosting the dll file. I edited the smb.conf with the following settings. [global]     map to guest = Bad User     server role = standalone server     usershare allow guests = yes ...

Unable to locate package linux-headers / E: Unable to locate package linux-headers-5.10.0-kali5-amd64

While compiling programs, you may encounter this particular error. E: Unable to locate package linux-headers-5.10.0-kali5-amd64 I encountered this while compiling a C code. To fix this, i first updated my Kali machine (v2020.2a).  sudo apt update -y && apt upgrade -y && apt dist-upgrade   Rebooted. Then installed the headers.   sudo apt install linux-headers-$(uname -r)  

Google Cloud : Basic Cloud Shell commands

Google Cloud resources can be managed in multiple ways. It can be done using Cloud Console, SDK or by using Cloud Shell. A few basic Google Cloud shell commands are listed below. 1)    List the active account name gcloud auth list 2)    List the project ID gcloud config list project 3)    Create a new instance using Gcloud shell gcloud compute instances create [INSTANCE_NAME] --machine-type n1-standard-2 --zone [ZONE_NAME] Use gcloud compute machine-types list to view a list of machine types available in particular zone. If the additional parameters, such as a zone is not specified, Google Cloud will use the information from your default project. To view the default project information, use gcloud compute project-info describe 4)    SSH in to the machine gcloud compute ssh [INSTANCE_NAME] --zone [YOUR_ZONE] 5)    RDP a windows server gcloud compute instances get-serial-port-output [INSTANCE_NAME...