
ESXi 6.x Custom Firewall Ruleset Creation

As you may all know, the ESXi host comes with an inbuild firewall similar to firewalld in Linux or Windows inbuilt Firewall and the ESXi firewall is enabled by default.

You can configure incoming and outgoing firewall connections for a service or a management agent from the vSphere Client or at the command line. But to define a custom firewall port for a service needs to be performed at the command line.

This article will help you to create a custom firewall ruleset in ESXi 6.x for any service. Here we take an Example of Syslog. You can refer the below article to know how to configure the syslog in ESXi which leverage the default syslog ports (TCP/UDP 514, 1514) as seen below.

https://docs.vmware.com/en/VMware-vSphere/6.7/com.vmware.esxi.upgrade.doc/GUID-9F67DB52-F469-451F-B6C8-DAE8D95976E7.html


-- Important point to remember that once you specify a custom port number in the above config, the logs will not be sent via the port until you create the ESXi custom firewall rule set.

 Syslog Service


Default Firewall Rule set for Syslog

Note- Each ESXi Service is tied to a firewall rule-set and when the service is started the rule-set gets enabled by default and there is no option in GUI to change the default Ports in the firewall rule set.

Why would you want to configure custom port??

It depends on several factors such as Security requirements or Syslog Log Collection Server requirements etc.

 
Set the syslog details in ESXi before creating the customer rule-set for it.

We can set the syslog details either via GUI (syslog.global.loghost) or command line as below:

In the above example, we use the port UDP 22222 as the custom port for syslog and syslog server IP as 192.168.5.5

Note:

*The Port has to be configured & listening in the destination server

*The Port has to be Allowed in the Network Firewall (if any)

To Set a Custom firewall Rule Set

Few important ESXi firewall commands can be found in the reference link listed at the last.

1.      Login to and browse to the ESXi firewall configuration location and perform a backup of the config.

$ cd /etc/vmware/firewall/

$ cp service.xml service.xml.bak        

      -- service.xml is the firewall config file

2.      No changes are allowed to the “service.xml” file by default only Read access. To enable access permissions, perform the below commands.

$ chmod 644 /etc/vmware/firewall/service.xml    -- To enable write Access

$ chmod +t /etc/vmware/firewall/service.xml       -- To toggle the sticky bit flag (This ensures only the file owner (root) user can modify the file permissions)

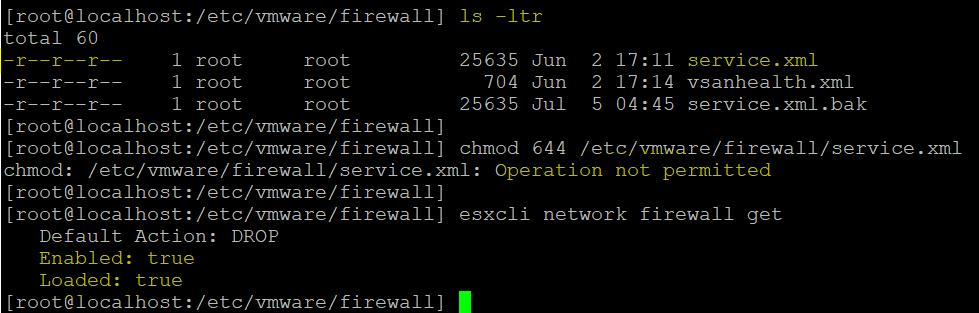
Above shows “Operation not permitted” Error, because by default the Firewall is Enabled and Loaded. Hence, disable and unload the firewall first as per Step 3 and perform step 2 again.

3.      To Disable the Firewall & Unload, run below

            $ esxcli network firewall set --enabled false

$ esxcli network firewall unload

4.      Perform Step 2 again to enable write permission to the file.

5.      Open the File in VI Editor to add the custom Rule set. Press “i” to insert and scroll to the bottom to add the new rule set.

6.      Add the below at the bottom of the configuration and save the file.

  <service id="increment the service id by 1 of the last entry">                

    <id>CustomSyslog</id>     

    <rule id='0000'>          

      <direction>outbound</direction>

      <protocol>udp</protocol>

      <porttype>dst</porttype>

      <port>22222</port>      

    </rule> 

    <enabled>true</enabled>

    <required>true</required>

  </service>          


Once saved, change back the permissions for the file to read only

$ chmod 444 /etc/vmware/firewall/service.xml

$ chmod -t /etc/vmware/firewall/service.xml

8.      Then Load the firewall and enable it.

$ esxcli network firewall load

$ esxcli network firewall set --enabled true

$ esxcli network firewall refresh

9.      You can view the new custom RuleSet created in the Firewall list in Gui and command-line as below:

 $ esxcli network firewall get

       $ esxcli network firewall ruleset list | grep -I “syslog”

You will see the new Custom Rule set named “CustomSyslog” is added with outgoing port set to UDP 22222

 Note: This article is written based on ESXi version 6.x


Reference

https://kb.vmware.com/s/article/2008226  

https://docs.vmware.com/en/VMware-vSphere/7.0/com.vmware.esxi.upgrade.doc/GUID-9F67DB52-F469-451F-B6C8-DAE8D95976E7.html

https://docs.vmware.com/en/VMware-vSphere/7.0/com.vmware.vsphere.security.doc/GUID-8912DD42-C6EA-4299-9B10-5F3AEA52C605.html

https://docs.vmware.com/en/VMware-vSphere/7.0/com.vmware.vsphere.security.doc/GUID-7A8BEFC8-BF86-49B5-AE2D-E400AAD81BA3.html#GUID-7A8BEFC8-BF86-49B5-AE2D-E400AAD81BA3

https://pubs.vmware.com/vsphere-51/index.jsp?topic=%2Fcom.vmware.vsphere.troubleshooting.doc%2FGUID-54AFB94B-75DE-4895-B1BF-EE498F92B717.html


Popular posts from this blog

Download Microsoft Office 2019 offline installer.

When you do malware analysis of documents or office files, it is important to have Microsoft Office installed in your Lab machine. I am using flare VM and it doesn't comes with MS Office. Since Microsoft is promoting Microsoft 365 over the offline version, finding the offline installer is not that easy. Here is the list of genuine Microsoft links to download the office .img files.  Download Microsoft Office 2019 Professional Plus : https://officecdn.microsoft.com/db/492350F6-3A01-4F97-B9C0-C7C6DDF67D60/media/en-US/ProPlus2019Retail.img Download Microsoft Office 2019 Professional : https://officecdn.microsoft.com/db/492350F6-3A01-4F97-B9C0-C7C6DDF67D60/media/en-US/Professional2019Retail.img Download Microsoft Office 2019 Home and Business : https://officecdn.microsoft.com/db/492350F6-3A01-4F97-B9C0-C7C6DDF67D60/media/en-US/HomeBusiness2019Retail.img Download Microsoft Office 2019 Home and Student : https://officecdn.microsoft.com/db/492350F6-3A01-4F97-B9C0-C7C6DDF67D60/media/en-U...

RUST error: linker `link.exe` not found

While compiling Rust program in a windows environment, you may encounter the error : linker `link.exe` not found. This is because of the absence of the C++ build tools in your machine. For compiling Rust programs successfully, one of the prerequisites is the installation of the Build Tools for Visual Studio 2019.   Download the Visual Studio 2019 Build tools from the Microsoft website. After the download, while installing the Build tools, make sure that you install the required components (highlighted in Yellow) This will download around 1.2GB of required files. Once everything is successfully installed, reboot and re-run your rust program and it will compile successfully.   Read More on RUST Hello World Rust Program : Code explained RUST Cargo Package Manager Explained Data Representation in Rust.

Cisco ASA: Disable SSLv3 and configure TLSv1.2.

For configuring TLS v1.2, the ASA should run software version 9.3(2) or later. In earlier versions of ASA, TLS 1.2 is not supported.If you are running the old version, it's time to upgrade. But before that i will show you the config prior to the change. I am running ASA version 9.6.1 Now ,set the server-version to tlsv1.2, though ASA supports version tlsv1.1, its always better to configure the connection to more secure. Server here in the sense, the ASA will be act as the server and the client will connect to the ASA.     #ssl server-version tlsv1.2 set the client-version to tlsv1.2, if required.     #ssl client-version tlsv1.2 ssl cipher command in ASA offers 5 predefined security levels and an additional custom level.     #ssl cipher tlsv1.2 high we can see the setting of each cipher levels using #show ssl cipher command. Now set the DH group to 24, which is the strongest offered as of now in the AS...

How to Install Netmiko on Windows?

Netmiko, developed by kirk Byers is an open source python library  based on Paramiko which simplifies SSH management to network devices and is primarily used for network automation tasks. Installing Netmiko in linux is a matter o f one single command but if you need to use Netmiko in your Windows PC, follow this process. 1) Install the latest version of Python. 2) Install Anaconda, which is an opensource distribution platform that you can install in Windows and other OS's (https://www.anaconda.com/download/) 3) From the Anaconda Shell, run “ conda install paramiko ”. 4) From the Anaconda Shell, run “ pip install scp ”. 5) Now Install the Git for Windows. (https://www.git-scm.com/downloads) . Git is required for downloading and cloning all the Netmiko library files from Github. 6) From Git Bash window, Clone Netmiko using the following command git clone https://github.com/ktbyers/netmiko&#8221         7) Onc...

Recovery Procedure: Alcatel-Lucent Omni-Switch not booting AOS: Going to Mini-boot prompt.

Problem: Switch not booting AOS; Going to Mini-boot prompt. Model: Alcatel-Lucent OS6850 [Note:The same procedure might be applicable for different models of Omni-Switches, However, for this illustration, i have used OS-6850 ] Reason: This problem may occurs due to corrupt AOS image files or misconfigured boot parameters. Hence switch cannot boot the images properly and will go to Mini-boot prompt.  Work Around: [Note: This zmodem procedure consumes a lot to time to finish the process.] 1.) Power off your OS6850 2.) When you switched it back on, stop it before the Miniboot (there is some counter counting down from 4). Press Enter to break. 3.) You will have the following prompt " => " 4.) Enter " setenv baudrate 115200 ”. Increasing baudrate helps to increase the data transfer speed using zmodem. 5.) Enter " saveenv " 6.) Enter " boot " 7.) The switch should run now in baud rate 115200 (so you have to change your clients ter...

[FIX] Can't locate Net/SNMP.pm in @INC (you may need to install the Net::SNMP module)

I was trying to use the snmpenum.pl in my lab and encountered this error. Can't locate Net/SNMP.pm in @INC (you may need to install the Net::SNMP module) I searched over the internet for the fix , but couldn't able to find something direct. However, going through some of the stackoverflow pages, i fixed it and is explained below. 1) First install the required packages related to snmp utilities. sudo apt-get install libsnmp-perl 2) Install the SNMP module for perl. perl -MCPAN -e 'install Net::SNMP' That's it. And i was able to run the script.

[FIX] yt_dlp.utils.DownloadError: ERROR: You have requested merging of multiple formats but ffmpeg is not installed

[ISSUE] While running your python code or while executing a job : yt_dlp.utils.DownloadError: ERROR: You have requested merging of multiple formats but ffmpeg is not installed [CAUSE] Your code is unable to find ffmpeg installed in your system. [FIX] Install ffmpeg in your system. 1) Download ffmpeg package from Git or already compiled executable from the official website .  2) Once downloaded, extract the zip file and place it in your desired location. eg: C:\  3) Now add the ffmpeg bin directory location in the user environment variable path.     In the User variables section. Select Path and click on New.  Click on New and add the path. Now compile your code and it should work. For the python code to download YouTube playlist, visit https://github.com/jaacostan/YTDL